


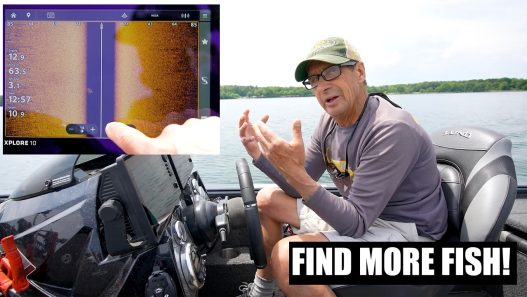






One of the biggest keys to consistently catching fish today is understanding how to use your electronics. We have more sophisticated sonar technology available to us than ever before, and when you learn how to use these tools correctly, they can completely change the way you approach fishing.
Whether you’re searching for walleyes, smallmouth bass, or panfish, modern electronics allow you to identify fish, locate productive cover, and understand exactly how fish are positioned on a particular piece of structure.
But here’s the thing: Having great electronics and knowing how to use them are two entirely different things.
Over the years, I’ve talked with countless anglers at fishing seminars who have invested in some pretty sophisticated sonar equipment. When I ask how many are using side imaging, it’s always interesting to hear the responses.
A lot of guys tell me, “I have side imaging, but I can’t tell what I’m looking at. How do you know what’s a fish and what’s a rock?”
That’s a pretty common problem, and it’s exactly what I want to help you understand.
For me, side imaging is one of the most valuable tools available when I first pull up on a new fishing spot. It allows me to quickly evaluate an area, identify key structural elements, and locate fish before I ever make my first cast.
Let’s look at how I set up my Humminbird electronics and how I use side imaging to break down a fishing spot.
Getting Your Side Imaging Settings Dialed In
The first thing you need to understand is that sonar settings make an enormous difference in what you’re able to see.
You can have the best electronics in the world, but if your settings aren’t properly adjusted, you’re missing a tremendous amount of information.
On this particular outing, I’m fishing Mille Lacs Lake in Minnesota, using a XPLORE 10 equipped with side imaging.
Before I start searching for fish, I want to make sure my unit is displaying the clearest possible picture.
Here are the settings I’m using as a starting point:
| Side Imaging Setting | My Setup |
|---|---|
| Sensitivity | 14 |
| Contrast | 17 |
| Dynamic Contrast | Off |
| Scroll Speed | 2X |
| Boat Speed | Approximately 3 mph |
| Color Palette | Golden Shiner |
| Side Imaging Range | 45–120 feet, depending on habitat |
These settings give me a really good picture of what’s happening beneath and alongside the boat.
Now, that doesn’t mean these are the perfect settings for every situation. Water conditions, bottom composition, depth, and the type of cover you’re searching can all influence how you want your unit adjusted.
The important thing is to start with a good baseline and fine-tune your electronics based on what you’re seeing.
Why Scroll Speed Is So Important
One of the most overlooked adjustments in side imaging is scroll speed.
This is a big deal because scroll speed influences how objects are displayed on your screen.
What I want to accomplish is to have my scroll speed properly matched to the speed of the boat so that the images I’m looking at are as clear and recognizable as possible.
On this particular outing, I’m traveling at approximately three miles per hour with my scroll speed set at 2X.
That combination is giving me a really good picture of the bottom.
I can identify individual weed clumps, rocks, boulders, and fish. More importantly, I can see how those elements relate to one another.
When you’re trying to identify small pieces of cover or individual fish, image clarity becomes extremely important.
If your scroll speed isn’t adjusted correctly, objects can appear stretched or compressed, making them more difficult to interpret.
Experiment with different settings at different boat speeds. Once you find a combination that produces a clear image, you’ll be amazed at how much easier it becomes to understand what you’re seeing.
Choosing the Right Side Imaging Color Palette
Another adjustment that can make a big difference is your sonar color palette.
Humminbird offers several different color options, and each displays bottom composition, structure, and fish a little differently.
Personally, I really like the Golden Shiner palette.
It’s the color scheme I use most often when I’m searching for fish with side imaging.
To my eyes, it gives me excellent definition between different types of cover and the surrounding bottom.
Other anglers might prefer Spring Craw or another available palette.
And that’s perfectly fine.
The important thing isn’t necessarily which color palette you’re using. It’s whether that particular palette helps you recognize what you’re looking at.
Spend some time experimenting with the different colors. Drive over areas where you already know what the bottom looks like.
Look at weeds, rock piles, sand transitions, and individual boulders.
You’ll start recognizing how each of those elements appears on your screen.
Once you develop that visual familiarity, interpreting side imaging becomes much easier.
Adjust Your Side Imaging Range to Match the Habitat
Here’s another really important consideration.
The range you select should be based on the type of habitat you’re searching.
When I’m fishing large, expansive sand flats like those found on Mille Lacs Lake, I can spread my side imaging range out considerably.
On these open flats, I’ll sometimes search as far as 120 feet out from the boat.
Because the bottom is relatively clean, fish and isolated pieces of cover can be much easier to identify.
That allows me to cover a tremendous amount of water efficiently.
But let’s say I’m fishing an area with dense weeds, scattered boulders, or complicated rock structure.
Now I might tighten my range down to 45 or 50 feet.
Why?
Because when you’re dealing with a lot of cover, there’s simply more information being displayed on the screen.
By narrowing the range, you can enlarge those individual objects and get a much better look at the details.
That becomes particularly important when you’re trying to distinguish individual fish from weeds or locate the biggest boulders within a rock pile.
It’s really a matter of matching your electronics to the environment.
On clean bottom, spread your range out and cover water.
When you encounter complicated structure, tighten things up and start looking for the details.
Using Side Imaging to Locate Walleyes in Weeds
On this particular outing, I’m working an expansive area of Mille Lacs Lake that contains scattered weed clumps, rock flats, and several interesting transitions.
As I’m moving across the area, I can see individual patches of weeds showing up on my sonar.
There are also walleyes scattered throughout portions of the weed growth.
What’s interesting is that these fish aren’t necessarily positioned in one big concentrated school.
Instead, I’m seeing smaller groups of walleyes scattered around the area.
Some are relating to individual weed clumps, while others are positioned around the surrounding structure.
This is where combining side imaging with traditional 2D sonar becomes extremely valuable.
Side imaging helps me understand the overall layout of the habitat and locate targets off to the sides of the boat.
Traditional sonar provides another look at what’s happening directly beneath me.
Together, these technologies give me a much more complete understanding of how fish are positioned.
And once you start seeing those relationships, you can begin making much better decisions about where to fish.
Why I Drop So Many Waypoints
One thing you’ll notice if you spend time fishing with me is that I’m not afraid to drop waypoints.
In fact, I drop a lot of them.
Some anglers are pretty selective about marking locations, but I look at waypoints a little differently.
For me, they’re not simply markers showing where I caught a fish.
They’re a way to document what’s happening on a particular piece of structure.
I’ll mark individual weed clumps, rock edges, boulders, points, and concentrations of fish.
And here’s where it gets interesting.
I had actually been fishing this same area two days earlier.
During that previous trip, I marked several locations where I was seeing fish and particular pieces of cover.
Now, just two days later, I’m seeing noticeably more walleyes moving into the area.
That’s telling me something.
These fish are starting to shift their location.
By comparing what I’m seeing today with the waypoints I dropped previously, I can begin to understand how the fish are moving and how they’re using the structure.
That’s one of the biggest advantages of modern electronics. You’re not just finding fish. You’re developing a history of fish movement.
And that information can become incredibly valuable throughout the season.
Understanding Seasonal Walleye Movements
Fish don’t remain in the same locations throughout the year.
Their movements are influenced by water temperature, forage availability, developing vegetation, and a variety of other environmental factors.
On Mille Lacs Lake, we see some pretty interesting seasonal transitions.
Earlier in the fishing season, shortly after the walleye opener, many of the fish in this particular area were positioned on shallow rock flats.
At that time, the weeds were still developing.
As the season progressed and the vegetation became more established, those same general areas began holding fish around the weed growth.
Now, as I’m examining the area with side imaging, I can see walleyes utilizing these developing weed clumps and the surrounding habitat.
That’s a really important lesson.
Sometimes the best fishing locations aren’t necessarily isolated spots. They’re larger structural areas that offer several different types of habitat.
You might have a shallow rock flat, an adjacent weed bed, and a series of small points or rock spines all located within a relatively short distance.
Fish can move between those areas as conditions change.
If you understand the layout of the structure, you’re in a much better position to follow those movements.
Finding the Transition Between Weeds and Rocks
As I continue moving through this area, the vegetation becomes noticeably thicker.
There are some pretty dense weed clumps, and I’m also seeing fish that could be bluegills, other panfish, rock bass, or possibly smallmouth bass.
But what really interests me is what happens as we move beyond those weeds.
The vegetation begins transitioning into a rock flat.
Now we’re getting into an entirely different type of habitat.
This is the same shallow rock area that held numbers of walleyes earlier in the season.
And right along that transition, there’s a very distinct rock edge.
That’s the kind of location that immediately gets my attention.
I’ve caught numbers of big smallmouth bass and walleyes on this particular spot over the years.
Why is it productive?
Because you have several important habitat elements coming together.
There’s rock, vegetation, an edge, and a transition between different types of bottom composition.
Those are all features that can influence where fish position themselves.
When I see a location like that on side imaging, I’m going to drop a waypoint.
Even if I don’t fish it immediately, I want that location documented so I can return to it later.
Zooming In to Find the Sweet Spots
Now here’s where side imaging really starts to shine.
Once I’ve identified a promising area, I don’t necessarily want to keep looking at the entire structure.
I want to start breaking it down into smaller pieces.
This is when I’ll tighten my side imaging range and enlarge the image.
On this particular rock flat, I’m looking for the biggest individual boulders.
And as I zoom in, those rocks become much easier to identify.
I can see individual boulders, small rock spines, and an inside corner that creates a little pocket within the structure.
That’s exactly the type of detail I’m looking for.
Think about it this way.
A large rock flat might cover several acres, but fish aren’t necessarily going to be distributed evenly across that entire area.
Often, certain portions of the structure are more attractive than others.
It might be the biggest boulder, an inside turn, the tip of a rock point, or a little pocket where several structural elements come together.
Those are the places I want to identify.
By tightening the range and examining those details, I can begin isolating the most promising portions of the structure.
And that’s a tremendous advantage when it comes time to actually start fishing.
Rock Spines, Inside Corners, and Points
As I continue examining this flat, several additional features become visible.
There are rock spines extending out into the lake.
There’s an inside corner with a little pocket.
And there’s a distinct rock point that drops toward the surrounding weeds.
That point is particularly interesting because it connects the rock structure with the vegetation we were examining earlier.
These are exactly the types of locations I want to investigate.
A rock spine extending into deeper water can provide fish with a defined structural feature.
An inside corner can create a natural holding area.
And the tip of a point often represents a key location where fish may position themselves as they move along the structure.
What’s really fascinating is how much of this information you can gather without ever making a cast.
Years ago, we might have spent considerable time fishing an entire rock flat just to figure out where the key spots were located.
Today, side imaging allows us to identify many of those important features before we even pick up a rod.
That doesn’t guarantee the fish will be there, but it certainly helps narrow down the search.
Don’t Just Find Fish — Learn Why They’re There
One of the most important things I’ve learned over the years is that finding fish is only part of the equation.
The real value comes from understanding why those fish are positioned where they are.
Are they relating to a weed edge?
Are they holding around isolated boulders?
Are they positioned on a shallow rock flat, or have they moved toward adjacent vegetation?
And how has their location changed over the past several days?
Those are the questions I’m trying to answer whenever I’m searching a new area.
Side imaging gives me an opportunity to look at the entire picture.
I can examine the habitat, identify individual fish, mark important locations, and begin developing an understanding of how everything fits together.
When you combine that information with your knowledge of seasonal fish movements and the forage available in the lake, you become a much more efficient angler.
Instead of randomly fishing areas that look promising on a map, you’re making decisions based on what you’re actually seeing beneath the surface.
A Simple System for Breaking Down a New Fishing Spot
When I approach a new piece of structure, my process is pretty straightforward.
First, I make an initial scouting pass.
I want to get a feel for the overall layout of the area. I’m looking for weed beds, rock transitions, points, and anything else that might concentrate fish.
Second, I adjust my side imaging range.
If I’m searching expansive sand flats, I’ll use a wider range to cover more water. When I encounter complicated structure, I’ll tighten the range for a better look.
Third, I identify and mark important features.
I’m dropping waypoints on individual fish, weed clumps, rock edges, and other structural elements that deserve a closer look.
Fourth, I zoom in on the most promising areas.
This is where I’m looking for the biggest boulders, inside corners, rock spines, and the tips of points.
Finally, I use that information to develop a fishing plan.
Rather than fishing an entire structure blindly, I can concentrate my efforts on the locations that appear most promising.
It’s a simple approach, but it can make a tremendous difference in how efficiently you locate fish.
The Bottom Line: Get More Out of Your Electronics
There’s no question that today’s sonar technology has changed the way we fish.
But one of the biggest mistakes anglers make is relying on their electronics without really understanding what they’re showing them.
Take the time to experiment with your settings.
Learn how weeds, rocks, sand, and fish appear on your screen.
Pay attention to how changing your range affects image clarity.
And don’t be afraid to drop waypoints as you explore different areas.
Over time, you’ll begin recognizing patterns and understanding how fish relate to specific pieces of structure.
For me, side imaging is one of the first sonar technologies I turn to when I pull up on a new spot.
It helps me cover water, identify important habitat, locate fish, and ultimately make better decisions about where to spend my fishing time.
The more you understand what you’re looking at, the less time you’ll spend searching and the more time you’ll spend fishing productive water.
And at the end of the day, that’s what becoming a better angler is all about.
— James Lindner, Angling Edge